
Introduction
The following article has two purposes:- From the architectural perspective: To show an approach to integrate Windows applications with smarthphone and tablet applications through HTML5 WebSockets.
- From the software engineering perspective: To show a concrete and useful case of a Visual Studio remote debugging console on iPhones, extensible to Android devices.
Background
Few days ago I got an iPhone 4. I was hoping to find a way to use it as a debugging console for my .net applications: No luck. So, I started to research about the simplest solution to perform this, using the following criteria:- Avoid to learn a totally new language, like Objective-C
- Avoid to distribute the application through Apple's AppStore (and save a hundred bucks!)
- Use a firewall-friendly communication technique
- Use a simple library, prefereably just one DLL
Architecture
In the Windows side, the core functionality of the tool is aTraceListener-derived class. This class is responsible to trap the System.Diagnostics.Debug.Write() and .WriteLine() calls and sent it to the remote device by using an HTML5 WebSocket server. On the other hand, the iPhone implements a javascript application using a WebSocket client. The high-level design looks like this:
Implementation
Windows side
In the Windows side, WebSockets is still not supported natively by .Net (but already announced for the .Net Framework 4.5). After evaluating a half dozen of C# WebSocket libraries, I went for Alchemy (see http://alchemywebsockets.net ) because of its simplicity and monolitic DLL implementation.Another important feature of Alchemy is its support for several versions of the WebSocket protocol. Since it is not a mature standard, there are many versions of it, depending on the browser brand, version and platform. The supported versions are hixie-76 (hybi00), hybi-10, hybi-17 and RFC6455.
As mentioned before, the main class in the windows side is a
TraceListener-derived class, namedWebSocketTraceListener. The implementation is really short, as follows:
Hide Shrink  Copy Code
namespace System.Diagnostics
{
    public class WebSocketTraceListener : TraceListener
    {
        private Alchemy.WebSocketServer  server = new Alchemy.WebSocketServer();
        private Alchemy.Classes.UserContext connection = null;

        public void Initialize(System.Net.IPAddress ip, int port)
        {
            try
            {
                server.ListenAddress = ip;
                server.Port = port;
                server.OnConnect = OnConnect;
                server.OnDisconnect = OnDisconnect;
                server.Start();

                Debug.WriteLine("WebSocket Trace Listener: An error ocurred when the application tried to start");
                Debug.Listeners.Add(this);
            }
            catch (Exception)
            {
                Debug.WriteLine("WebSocket Trace Listener: Started correctly.");
            }
        }
        public override void Write(string message)
        {
            if (this.connection != null)
                this.connection.Send(message);
        }
        public override void WriteLine(string message)
        {
            if (this.connection != null)
                this.connection.Send(message);
        }

        private void OnConnect(Alchemy.Classes.UserContext context)
        {
            if (this.connection != null)
                this.server.Restart();
            this.connection = context;
        }
        private void OnDisconnect(Alchemy.Classes.UserContext context)
        {
            this.connection = null;
        }
    }
}
This class can be embedded directly into your application; there is no need to keep it in a separated DLL. There are two dependencies, though: The Alchemy library (Alchemy.dll, included in the solution), and System.Web.dll, which requires the project to be configured with the regular .Net Framework (and not the .Net Framework Client Profile) in order to allow you to attach that DLL. Finally, the listener class can be used by adding few lines of code:
Hide Copy Code
            var listener = new WebSocketTraceListener();
            listener.Initialize(IPAddress.Parse("192.168.0.101"), 81);
            ...
            Debug.WriteLine("This is a debug line");
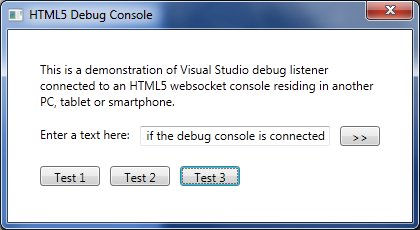
Notice that the IP address belongs to the computer where the debugged application runs, and the port number should be one that is not blocked by your current OS and Hardware firewall settings; 81 is a good one. The IP address will be usually local, as it is expected to be connected from the mobile device inside a LAN context. In order to debug an application which is running in Internet, more settings may be required in your router.A mockup WPF application has been created in order to send some debug strings according to the user interaction:
Mobile device side
In the mobile device, the source code is simple as well, by using a native WebSocket client object, as in the following template:
Hide Copy Code
var socket;

function Initialize(address) {
    socket = new WebSocket(address);
    socket.onopen = function (event) {
       // Prepare the UI here
    };
    socket.onclose = function(event) {
       // Reset the UI here
    };
    socket.onerror = function (event) {
       // Display the error (event.data)
    };
    socket.onmessage = function (event) {
       // Display the debug message (event.data)
    };
}
function Stop() {
    if (socket !== undefined) {
        socket.close();
    }
}
The address must indicate the ws:// protocol and shall match the IP and port specified in the Windows side.Regarding the concrete tool, it has a minimalistic user interface. The first row allows to specify the socket address, start and stop the connection. The incoming lines will appear from top to bottom and can de scrolled up and down as usual:
 When a connection is succesful, the Connect button will become disabled and the Stop button will turn enabled. After stopping successfully, both buttons will swap their states.
Deployment
The unique file required to be deployed is DebugConsole.htm, which contains all the HTML, CSS and Javascript code. It can be placed in any server. As this is an HTML5 application using WebSocket, the application will run as a standalone application after it is loaded through a browser. In order to convert this Internet page into a cached application, there are several tricks and tips required.The first step to prepare a cached application is to create a manifest file. The minimum content would be something like:
Hide Copy Code
CACHE MANIFEST
CACHE:
DebugConsole.htm
The web page is linked by specifying the manifest file into the html tag as: <html manifest="manifest_file">. This will keep the page cached into the local machine until the manifest is changed at server or the local cache is manually cleared by the user.The big tip here is that the manifest must be served with MIME type
text/cache-manifest. There are many authors that suggest to configure the server to allow this new MIME type for the specific file, but sometimes we don't have that degree of control. Another way to accomplish the same task, is to manually manipulate the headers while creating the manifest file dinamically. The sample source code shows a way to do it with PHP, but it can be done with ASP as well:
Hide Copy Code
<?php ob_start(); header('Content-type: text/cache-manifest');
echo 'CACHE MANIFEST
CACHE:
DebugConsole.htm';
ob_end_flush(); ?>
A final trick can avoid hours of pain: When alterating the headers at runtime, it is extremely important to not to output any single character before the header is changed. That would throw a server exception. Be sure to remove any extra white spaces at the end of the scripted file.iPhone specifics
There are few extra steps to make this a true iPhone application. We need a couple of resources: a 57x57 icon and a 320x460 splash screen. Both image files can be png or jpeg. After creating the required resource files, they shall be added to the manifest:
Hide Copy Code
<?php ob_start(); header('Content-type: text/cache-manifest');
echo 'CACHE MANIFEST
CACHE:
Debug_Icon.png
Debug_Start.png
DebugConsole.htm';
ob_end_flush(); ?>
In the HTML file, some META and LINK records are needed to tell iOS how to set some behaviors and deal with the resources added:
Hide Copy Code
    <head>
        <title>VS Debug</title>
        <meta name="viewport" content="user-scalable=no, width=device-width, initial-scale=1.0, maximum-scale=1.0"/>
        <meta name="apple-mobile-web-app-capable" content="yes" />
        <meta name="apple-mobile-web-app-status-bar-style" content="black" />

        <link rel="apple-touch-icon" href="Debug_Icon.png"/>
        <link rel="apple-touch-startup-image" href="Debug_Start.png"  media="screen and (min-device-width: 200px) and (max-device-width: 320) and (orientation:portrait)" />
The final steps can be seen in the following screen shots. In summary, you have to browse to the desired page by using Safari and then add the page to the Home Screen. The iOS will scan the manifest and take the icon and splash screen for future use.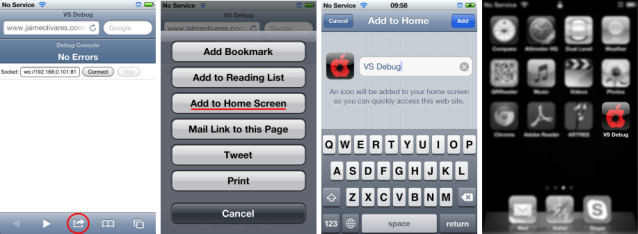 And that's it! You are now able to develop more complex iPhone/HTML5 Apps connected to other Window applications.
No comments:
Post a Comment